Today I did a guest post over at Kelly in the Kitchen. I shared today’s slow cooker recipe, so head on over there and let her know that I sent you! Hope you enjoy :]

Wednesday, June 29, 2011

Tuesday, June 28, 2011
Mallow-Mint Hot Chocolate

Ingredients
| 4 to 5 cups nonfat dry milk (can be substituted) |
| 1/2 to 3/4 cup baking cocoa |
| 3/4 to 1 cup sugar |
| 11 cups water |
| 2 teaspoons mint extract |
| marshmallows |
Combine all ingredients in 4 1/2 to 6-quart slow cooker. Cover and cook on low heat 3-4 hours, stirring occasionally. Makes 10-15 servings.
Serve with mint chocolate chips or a small peppermint candy cane.
I am linking up to some pretty amazing parties tonight!
Linky Parties
These are the weekly linky parties that I will be linking up to. As I find more I will link them up. If any of you have any parties that are not on the list then please comment and let me know :]
Monday
making the world cuter, polly want a crafter, life made lovely, keeping it simple, miss crafty pants, homemaker on a dime, sumos sweet stuff, singing three little birds, KdBuggie Boutique, sugar bee crafts,
Tuesday
tip junkie, get your craft on, hope studios, young nester, ladybug blessings, giggles, glitz & glam, vintage wannabe, my uncommon slice of suburbia, a diamond in the stuff, cherished bliss,
Wednesday
Eisy Morgan, Sew Woodsy, My Backyard Eden, Blue Cricket Design, Sew Much Ado, Women Who do it All, Thrifty Home, my girlish whims, polka dots on parade, sugar and dots, gluesticks,
Thursday
fireflies and jellybeans, somewhat simple, beyond the picket fence, the train to crazy, yesterday on tuesday, house of hepworths, born-again crafter, the shabby chic cottage,
Friday
hodgepodge life, chic on a shoestring, whipper berry, momma's kinda craft, bubbly nature creations, at the picket fence, french country cottage, nap time crafters, fingerprints on the fridge, freckled, life rearranged, bacon time,
SATURDAY
Monday, June 27, 2011
Wooohooo!
I am extremely close to 700 followers! I am currently at 629 followers all I need is 71 more and guess what will happen then…?
I will give away one little bottle with your choice of initial and color!

In order to win all you have to do is leave a comment with you contact information and what number GFC follower (located on the right sidebar under follow) you are!
Example – Ashley Causey ashleysbookshelf@gmail.com #631
This giveaway will stay opened until I reach 700, so tell your friends!
Potato, Broccoli and Sausage Skillet
Tonight we all tried a new recipe that mom found online. I personally think that the name is way too long so I am going to refer to it as PBSS.

| Prep Time | Total Time | Servings |
| 10 Min | 38 Min | 6 |
Ingredients
1 box (4.7 oz) scalloped potatoes (We used the Great Value Au Gratin potatoes)
2 cups hot water
2/3 cup milk
2 tablespoons margarine or butter
2 cups sliced fully cooked sausage (We used regular Wal-Mart sausage :])
1/2 cup Thick ‘n Chunky salsa
2 cups frozen broccoli florets
Directions
Nutrition Facts
1 Serving (1 Serving)
- Calories 190
- (Calories from Fat 45),
- Total Fat 5g
- (Saturated Fat 1 1/2g,
- Trans Fat 1/2g),
- Cholesterol 20mg;
- Sodium 1210mg;
- Total Carbohydrate 24g
- (Dietary Fiber 2g,
- Sugars 3g),
- Protein 11g;
- Vitamin A 15.00%;
- Vitamin C 15.00%;
- Calcium 6.00%;
- Iron 4.00%;
Simple *Lovely* Baby + Giveaway!
Simple *Lovely* Baby was most gracious enough to send me a nursing cover to review and then offer up an additional one to a lucky reader :]
I know that I don’t have any children now, but hopefully sometimes in the near future God will open that door for me and when He does I will have this wonderfully stylish cover.

The material feels wonderfully soft and thin, and the little fabric rose will help you to remember which side you used last. It is great that the material is thin so that you and baby does not get too hot.
Etsy Description
The nursing cover features d-rings and straps to make it completely adjustable around your neck, it has a pop out front so you and baby can still look at each other while nursing and it has a built in pockets on the inside made out of flannel, it is soft enough to use to wipe baby's mouth, hold a pacifier or a burp cloth.
This nursing cover is an extra large cover, measuring at 41 inches by 29 inches, with a generously sized window to keep eye contact with baby, encouraging bonding.
The extra large sizing allows you to use it for both nursing, and when weaned, or while out and about as a sun shade for your umbrella stroller.
The reminder pin is made out of hot pink material with white polka dots, wrapped into a fabric flower. It is attached to a pin so that you can remove it to switch sides and remember which side baby last nursed off of.
The cover is double stitched in a hot pink thread for both durability and for appearance. It is available with a blue thread, black or white and countless options for the fabric flower.
The nursing cover is machine washable and easy to wear!
Important note from the designer!
** Every year we walk with March for Babies in honor of our son, Matthew Jackson Miller who passed away October 15, 2007. 10% of all sales will benefit our team and the march of dimes: http://www.marchforbabies.org/team/t1472173 **

-------------------------------------------------
Buy it! You can buy this cover here (ARV. $25)
Win it! One lucky reader will win a free nursing cover with flower clip of the seller’s choosing!
Coupon it! Right now you can save up to 15% off of your order with using the code Ashley15!
In order to win a nursing cover all you have to do is leave a comment, with your contact information and be a GFC follower (on the right side under follow)!
Extra Entries:
+1 “Like” Simple *Lovely* Baby on Facebook
Disclosure: No compensation was given for this review/giveaway. I did receive a sample product from the sponsor for the purpose of this honest review. This did not affect the outcome of this review. All opinions are 100% my own. For full disclosure click here.
Happy Camper!
Look at the cute little coin purse that I won from The Gunny Sack!

I cannot wait until I receive this little cutie :]
Day 1 – Party Hot Chocolate
Today is day 1 of the 101 days of things to do with a slow cooker. The recipe today is one that I would have never thought of doing in the crock pot, look below for the recipe.
Party Hot Chocolate
| 4 to 5 cups | nonfat dry milk |
| 3/4 to 1 cup | sugar |
| 1/2 to 3/4 cup | baking cocoa |
| 2 teaspoons | vanilla |
| 11 cups | water |
Combine all ingredients in 4 1/2 to 6-quart slow cooker. Cover and cook on low heat 3-4 hours, stirring occasionally. Makes 10-15 servings.
Serve with whipped cream sprinkled with mini chocolate chips or white chocolate chips.
Let me know if any of you decide to make this, or if you have any tips :]
Happy slow cooking and I will see you all tomorrow for Day 2!
Helpful Hints
Here are a few helpful tips to guide you through the next 101 days of things you can do with a slow cooker.
1. To make clean-up easier, spray the inside of slow cooker with non-stick cooking spray before adding ingredients.
2. To test the cooking temperature of a slow cooker, fill it 3/4 full of water, cover, and turn on high heat for 4 hours. With an instant heat thermometer, test water temperature immediately after lid is removed. Temperature should be at least 180 degrees. If the temperature is lower, we recommend replacing the slow cooker. If it is higher, check all recipes for doness after 3 hours of cooking time.
3. As a general rule, lifting the lid off the slow cooker lengthens the cooking time by 30 minutes to an hour.
4. Stirring is generally not necessary until time to serve.
5. Your slow cooker should be at least 1/2 full to ensure proper cooking.
6. Recipes that contain raw poultry or beef should cook a minimum of 3 hours on high heat. Combinations of raw meat and fresh vegetables should cook at least 4 hours on high heat.
7. Adapting favorite oven recipes to a slow cooker:
| Conventional Oven | Slow Cooker | Slow Cooker |
| 15-30 mins. | 1 1/2-2 hours | 4-6 hours |
| 35-40 mins. | 3-4 hours | 6-10 hours |
| 50 mins.-3 hours | 4-6 hours | 8-18 hours |
8. One hour on high heat is equal to 2 1/2 hours on low heat. (High heat = 275-300 degrees; low heat = 200 degrees. Heat varies from brand to brand).
9. If your stoneware is removable, never place it on a stovetop burner.
10. At clean-up, cool the stoneware liner somewhat before adding water; this will prevent cracking.
11. Ground beef should be browned and drained before adding to slow cooker.
12. Fresh milk, cream, sour cream, and cream cheese should be added during the last hour of cooking to prevent curdling. Evaporated milk does not curdle and can be substituted for fresh milk in most recipes.
13. Long-grain converted rice is recommended for rice dishes.
14. Root vegetables (onions, carrots, potatoes, turnips) take longer to cook than meat. Place vegetables on bottom and around sides of slow cooker so they get the most direct heat.
15. Tough, inexpensive meat cuts work well. The moist, gentle heat slowly tenderizes these cuts as they cook.
16. Don’t add more liquid than a recipe calls for, as liquid is retained.
17. If there’s too much liquid at the end of cooking time and you want to thicken it, stir in some instant mashed potato flakes, instant tapioca, flour, or cornstarch.
18. If you start with a frozen cut of meat, add 2 hours to your cooking time on high heat or 4-6 hours on low heat.
19. For recipes that call for minced garlic, prepared jarred garlic may be substituted.
20. Fresh chopped onion can be used in place of dried minced onion. One medium fresh onion equals 1/2 cup dried.
21. Recipes can be assembled and stored in the refrigerator the night before (unless they call for uncooked pasta). In the morning, place cold stoneware in cold electrical base. DO NOT PREHEAT ELECTRICAL BASE. Once stoneware is in place, turn to preferred heat setting.
22. To remove scratches from stoneware, use Bon Ami or vinegar and baking soda. Baking soda also works well to clean the electrical base. DO NOT SUBMERGE ELECTRICAL BASE IN WATER.
Happy slow cooking!
101 Things to do with a Slow Cooker
Today I am starting a new blogging series that (I hope) will be posted every day for 101 days. We had a book fair a month back at my job and I bought these 3 unique recipe books that show 101 things that you can do with a Slow Cooker, Cake Mix, and Ramen Noodles. I decided to start with the slow cooker book first because that is my favorite way to cook :]
I will start later today with the first post. I may not make the recipes each day, but I thought it would be nice to share with you all.

Cake Plates
I saw this idea floating around the web and I decided to try it out with my own little twist. What do you all think?


I will be linking up to some awesome parties here.
Also don’t forget to check out my Etsy page! I am trying to reach my goal of purchasing a Brother Sewing and Embroidery machine! I would love all the help I can get :]
Saturday, June 25, 2011
Coffee Cozy
This post was actually suppose to go up on Thursday, but I went to Wal-Mart instead :] Sorry everyone, but that was pay day! Thursday I made this little cutie below:

Want a way to keep your coffee cozy and your precious hands from getting burned as you rush into the car late for work because you forgot to set the automatic button on the coffee pot and you know how there is no way that you can make it through a long hard day at work without your mojo (yep! I done this before). Or if you have the luxury to get a cup of joe without rushing then this will keep your mug looking stylish as well as keep your hands from getting too toasty.

This was a really neat project to do! I decided to give mine a quilt look to it and make more durable.
I am linking up to some awesome Thursday’s parties so check them out!
fireflies and jellybeans - somewhat simple - beyond the picket fence - the train to crazy - yesterday on tuesday - house of hepworths - born-again crafter - the shabby chic cottage
Thursday, June 23, 2011
Frost
I am not sure if you all have noticed that I have been currently reading Frost by Wendy Delsol or not, but I am sad to say that I finished it :[ It was one of the best books I have read in awhile. It made me cry, laugh out loud, get angry, as well as fall in love all over again with the hunky Jack Snjosson. Jack cannot only control the weather, but he can make any reader’s heart melt with his romantic side. Before I talk too much more about this book I want to share the cover and synopsis with you and then I will share why you should go pick up this book ASAP (which is October 11th) :]

Wendy Delsol’s FROST, is the sequel to her YA debut STORK.
After the drama of discovering that she’s a member of the Storks, a mystical order of women endowed with powerful abilities, Katla Leblanc is finally settling into her life in chilly Minnesota. In fact, the ex-California girl even hopes for a white Christmas. But Katla’s wintry wish unexpectedly turns into the snowstorm of the century, drawing the attention of Brigid, a gorgeous environmental researcher with an amazing array of fur coats and an unusual interest in Katla’s boyfriend, Jack.
Inspired by Norse mythology and Hans Christian Andersen’s THE SNOW QUEEN.
In case you missed my review of the first book in the series, Stork, check it out here.
Frost, was indeed ten times better than Stork. This had more of a race against time mythological story whereas in Stork, Katla was still trying to figure herself out and why she felt so close to Jack.
With most books, in today’s time, it seems like you keep reading the same story over and over with a little twist from author to author, but with Delsol it is completely different. Her books are completely original and I can’t help but to think that she has one extreme imagination that I wished I had. As I have read Stork and now Frost, I still cannot seem to predict what will happen. Once I predict something then the next page will change that prediction.
I guess to narrow my thoughts all down I would summarize it to this. Delsol you ROCK! I can only hope that there is another book or movie to be made from the epic adventure.
Preorder it! You can preorder Frost here on Amazon!
Win it! One lucky winner will won my slightly used copy of Frost!
To enter all you must do is simply comment with your contact information so that I can get in touch with you if you win.
Must be a GFC follower!
Disclosure: No compensation was given for this review/giveaway. I did receive a sample product from the sponsor for the purpose of this honest review. This did not affect the outcome of this review. All opinions are 100% my own. For full disclosure click here.
Wednesday, June 22, 2011
{Emergency! Clutch}
If you all haven't noticed I am completely obsessed with Pinterest, and all the amazing crafts that you can find online and keep them all in one safe place. It's like organization of your thoughts :]I came across a post called A Girl's Emergency Clutch and I thought it read A Girl's Embroidery Clutch so I clicked on it and then realized my mistake, but was so glad that I found it!
How many of you seem to have little odds and ends in your bag that are too important not to have in the bag? And how many times have you stopped at a red light and had to chase that bottle of Tylenol around in your bag before the light turns green? If you answered yes to one of these questions then this is project for you!
I will start by showing you the pictures of the one I made and then I will give you the link to the whole tutorial. Sound like a deal?


Here is the link to the FULL TUTORIAL
I really wish that I had a decent camera that was able to capture the true uniqueness of this project, but sadly I do not. Wish camera do you all recommend?
I am linking up to some pretty amazing parties tonight, so make sure to check them out:
Eisy Morgan, Sew Woodsy, My Backyard Eden, Blue Cricket Design – craft, Sew Much Ado – craft, Women Who do it All – craft, Thrifty Home – craft, my girlish whims – craft, polka dots on parade – craft, sugar and dots – craft, gluesticks – craft
**These are currently for sale in my Etsy store for only $10! Help me to reach my dream of purchasing a Brother Sewing and Embroidery Machine!**
Tuesday, June 21, 2011
HOOT couture
My friend Charlee (House of Tucker) and I have been brainstorming different things that we can put on tile and cut out with my cricut. Today we decided to cut out some cute little owls from the Hoot N' Holler cartridge. Below is what we came up with.


In order to make one of these awesome tiles is to get some tile (obviously!), mod podge, spray acrylic, and any kind of designs you want. When you are ready to add it to the tile you will need to mod podge the tile then add the design and mod podge over it. Do at least three coats and then when it all dries spray two coats of the acrylic over it and let it dry. Volia! you are done. Hang the little cutie on your wall or use as a coaster for your drinks. Let me know what you think?
I am linking up to some pretty amazing parties tonight. Check them out!
Sunday, June 19, 2011
Yard Sale Finds 6/18/11
Look at all these AMAZING finds that I got Saturday June 18th!


The purple dotted fabric is still on its board. I do not know how many yards it is, but it only cost $3. I go two of the little brown square frame for .25 cents a piece (the other one is the one that I made my thread holder out of). The Georgia Bulldog fabric was $2 and the two pictures was $1 each.
Feel free to share any finds that you may have found in the comment section. I would love to hear from you :]
Thread Holder + Tutorial
I first seen this idea while looking through different party link ups. The one that I saw was yellow and they used nails. I put my own little twist on it and I think it came out wonderful.

Wanna know how I made this little cutie? First of all you need to grab all your supplies. This is what I used, but feel free to switch it up a bit.
Supplies:
- Board (I got two of mine at a yard sale for $.25 cents a piece!)
- Fabric of scrapbook paper for the background (I used fabric)
- Mod Podge
- Clear Acrylic Spray
- Dowels
- Drill, Saw, and Nails
- Thread to put on when finished :]
The first step is to touch up your board if it needs it and then cut a shape of fabric or paper to mod podge to the board. Next you will need to put a layer of mod podge on your board and then lay down your material and mod podge over it. Do not worry because this dries clear. It is best if you put at least 2 coats. While it was drying I tried cutting my dowels with scissors, but it was too slow so I used and electric saw. I got my dad to “help” out with this part.

Next we started measuring where to put our dowels before we drilled the holes.

Once we got all the holes drilled we placed the dowels in and then I went back and hot glued some of the really lose ones. After all the dowels are in all that is left is to add the spools of thread on the board. If you can see in this last picture I arranged them from lightest to darkest.

So what do you all think? I am linking up to some pretty awesome parties today, if you look on the right sidebar you can see the buttons :]
Friday, June 17, 2011
Apple Cake Pops + Tutorial
I am not sure how many of you have seen the cake pops that have been going around. I bought this book awhile back and it had some pretty amazing recipes and ideas in it. The author of the book eve has her own website where she shares some ideas and recipes that were not included in the book, such as Winnie the Pooh.
My younger sister and I set out yesterday to purchase the items needed for the pops, but it was too late by the time we got home to get started since we had to be at VBS at 5:30 and I was in desperate need of a nap :] So we pushed it off until today.
I did the first few steps while she was at a friend's house. The first thing I did was gather my supplies and then started on baking the cake.


Of course I had to stop and take a breakfast break :] Omelet and chicken patty!


Final product! They didn't turn out as pretty as in the book, but I think they are pretty darn cute :] When I asked my sister what she thought of the project she said that her favorite part was eating them and crumbling the cake and her least favorite was how long it took to make them. We kept running into the fact that they would not stay on the sticks when we dunked them in the melted candy. That is how we ended up making apples not on a stick. I cannot wait to show these around at our Father's Day/Birthday party tomorrow :]
Wednesday, June 8, 2011
Giveaway Linky - June 8, 2011

Link up your giveaways or any of the ones that you come across on the web so that we all can see them and enjoy them :]
Tuesday, June 7, 2011
Lucky the Elephant!
So the other day I was hunting around the web and I came across this cute little elephant tutorial. I spoke with the seller and she agreed to let me review it!
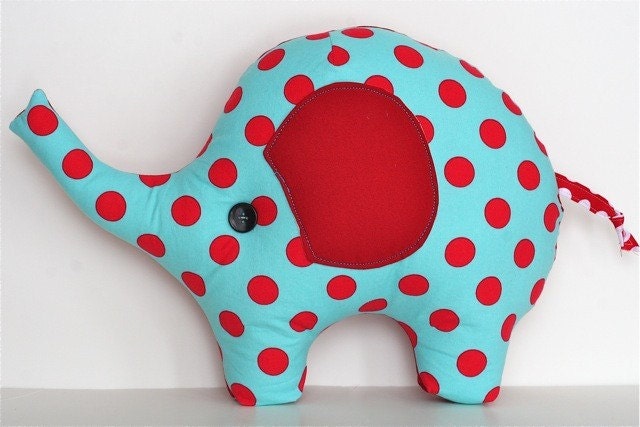
The above image is the seller's image. I am a little sketchy when it comes to buying sewing patterns online, but I have to say that this pattern's instructions were extremely well written and easy to follow. The only trouble that I had was the box feet. I finally gave up and did regular feet and I also added a little tail and hair bow. Below is my little Ellie :]

It is not exactly the colors she used but I think it turned out cute. Another difference that I did is that I didn't attach the whole ear to the body I just sewed the straight area and left the ears floppy :]

The only thing that I didn't like about making the elephant is that you are not allowed to sell your creations online. The only thing that you can sell is everything else besides the pillows. I understand why she doesn't allow it and I respect it, but I like to be able to sell my creations :]
Want to try your own hand at this simple to follow tutorial? Visit there STORE!
Also check out her other sites (sometimes she has free tutorials :])
Disclosure: No compensation was given for this review/giveaway. I did receive a sample product from the sponsor for the purpose of this honest review. This did not affect the outcome of this review. All opinions are 100% my own. For full disclosure click here.
Disclosure
Disclosure
In order to abide by the FTC guidelines, disclosure is as follows:This blog is a personal collaborative blog written by one individual. For questions about this blog, please contact ashleysbookshelf@gmail.com.
This blog accepts forms of cash advertising, sponsorship, paid insertions or other forms of compensation. This blog reserves the right to choose what products or businesses will be featured based upon the readers interests and needs.
The compensation received will never influence the content, topics or posts made in this blog. Compensation is for the time and effort to create a blog posting. The owner of this blog are compensated to provide opinion on products, services, websites and various other topics. Even though the owner of this blog receives compensation for our posts or advertisements, we always give our honest opinions, findings, beliefs, or experiences on those topics or products. The views and opinions expressed on this blog are purely the bloggers’ own. Any product claim, statistic, quote or other representation about a product or service should be verified with the manufacturer, provider or party in question.
All advertising is in the form of advertisements generated by a third party ad network. Those advertisements will be identified as paid advertisements. This blog cannot guarantee direct business will be made through advertising on this site. Results vary. Occasionally, affiliate links may provide compensation through clicks and purchases from their site.
This blog does not contain any content which might present a conflict of interest. This blog is not responsible or liable for any products that are featured on this site. This disclosure applies to all postings on this blog, facebook, twitter and other sites used by A Sew Chic Boutique.
Sunday, June 5, 2011
Sewing, Sergers, and Embroidery Machines?
Hi everyone! I am seriously thinking about getting a serger and an embroidery/sewing machine. I currently have a Singer Simple and it works great, but I want to embroider also. I have seriously been considering the Project Runway Limited Edition LB-6800PRW Sewing and Embroidery machine. Do any of you have this machine and if so what are your thoughts on it? Anyone interested in selling one, or one similar to it?


Next is the serger. The serger that I have been looking at is the Project Runway Limited Edition 5234PRW. The serger is not available until October, but I am thinking about adding this to my wishlist for Christmas :] Any thoughts on this serger or any sergers? Anyone willing to sell one similar to it?
The next thing that I wanted to talk about was the fact that I have a sewing machine that I plan on selling once I get around to purchasing the Brother Sewing and Embroidery machine. It is a Singer Simple and it comes complete with extra bobbins and a cover.
Here are a few of the features:
- 23 Built-in Stitch Patterns: 6 Basic Stitches, 11 Decorative Stitches, 5 Stretch Stitches, 1 4-Step Buttonhole plenty of stitches for any project
- Automatic Reverse: Automatically sew in reverse and reinforce stitches
- Automatic Needle Threader: Easily threads the needle without frustration or eye strain
- Adjustable Stitch Length and Width: Adjust the desired stitch length by a simple turn of the dial
- Adjustable Tension: Ensures excellent straight stitch quality regardless the type of fabric sewn
- Automatic Presser Foot Pressure Control: Sew from lightweight to heavy fabric without making presser foot pressure adjustments
- Snap-On Presser Feet: Quick release for easy on and off change presser feet in a snap!
- Heavy Duty Metal Frame: Rigid support holds all the mechanisms in perfect alignment for perfect sewing and durability
- On Board Storage: The removable sewing bed means accessories are always handy
- Free Arm: Provides professional results by offering easy access to cuffs, collars, pant hems and other difficult-to-reach areas
- Center Zigzag Taper: When tapering with the zigzag stitch, the stitch tapers to the center, not the left or right
- Twin Needle Capability: When using an optional twin needle, parallel rows of straight stitching can be sewn for hemming or to add a decorative touch
- 5-mm Stitch Width : Decorative and satin stitches can be set to 5-mm wide making are bolder and more pronounced look
- Multiple Needle Positions: Can be changed for individual projects, such as inserting zippers or cording and topstitching
- Extra-High Presser Foot Lifter: Offers more clearance for multiple layers of bulky fabric under the presser foot

I would like to get around $100 for it including shipping, but I am willing to make a deal, so if you are interested email me at ashleysbookshelf at gmail dot com and make me a deal :]
Peace and Sewing,
Subscribe to:
Posts (Atom)